
How to 3D Scan a Building.

In this article I will explain my process for 3D scanning buildings and hopefully encourage you to head out with your camera and start creating your own photogrammetry scans!
Photogrammetry, what is it?
Photogrammetry is the science of recording measurments in 3D space using multiple 2D photographs of an object or environment taken from different locations.
By identifying similar points in each photograph, photogrammetry software is able to triangulate their positional measurements and create a 3D representation of where they exist on the X,Y & Z axis’ - this is known as a point cloud. From here the software is able to generate a solid mesh and create the 3D model.
What you need to get started -
Before we begin taking photographs I will outline the tools and software you need in order to have a fighting chance at creating some decent scans. Of course, like most things involving computers, there is more than one way to reach a similar end goal. There are numerous pieces of software out there that are capable of producing 3D models from photographic imagery - Reality Capture, Meshroom, 3DFZephyr and Agisoft Metashape are to name but a few.
I encourage you to have a look into them for yourself and find out which one suits your needs. For the purposes of this article I will be using Reality Capture.
Once you have settled on a chosen piece of software the next thing you will need is something to capture your photographs. This can range from a smart phone to a professional DSLR - as long as you’re not using something with a potato-quality camera you should be fine. The general consensus is anything 12MP and above will be suitable.
However, as this article is about scanning buildings we are going to need something a little different.
Drones -

Image - DJI MINI 2, DJI website
In recent years drones have become more accessible to the average consumer and you can now pick one up with decent flight, battery and camera capabilities fairly easily.
I use the DJI Mini 2 and it has proved to be remarkably capable of producing the content I need to create 3D scans.
With the recent release of the Mini 2 SDK (Software Development Kit) third party app developers, such as Litchi, have been able to integrate the Mini 2 into their flight software; unleashing even more of this little drones potential.
Another advantage of using drones to create photogrammetry models is that the aerial photos they capture are geotagged. The latitude, longitude and altitude of the drones GPS sensors are embedded within the metadata of each photo and can be used to enhance the accuracy of the final modelled output.
Third Party Flight Software -
While DJI’s proprietary flight software for the Mini 2 is perfectly usable, it still lacks some of the features needed in order to make life easier for youself when carrying out surveys and scanning flights. This is where third party apps come into play.
Litchi is the most widely used and trusted autonomous flight app for DJI drones. The waypoint mission planning feature is incredibly useful for automating the photo capturing process and allows the pre-planning of flights which can be synced across all your devices.
Storage -
Most drones us a micro SD card to store information on; because we are going to be taking a large number of high quality photos the SD card you use needs to be at least 32GB. I would recommend the SanDisk Extreme 32GB as it has enough storage space and a sufficient write speed allowing you to record 4K video if you need to.
Next Steps…
Choosing a Subject -
Once you have aquired all the necessary gear mentioned above, it’s time to choose a subject to scan.
For your first scan it’s probably best to choose a small building which has a decent amount of free or open space surrounding it. Trees and vegitation can pose a problem when capturing your scans; they can be tricky to navigate around and often times aren’t reconstructed well in the photogrammetry software. That being said, it can be hard to avoid trees and vegitation completely, so just be aware of these caveats and make sure you have a line of sight to your drone at all times! Another thing that is important to mention is that large areas of glass can be hard to reconstruct accurately due to their reflective appearance, so keep this in mind when choosing a subject.
It should also go without saying that you should make sure you have the necessary licenses and insurance in place before you fly your drone. In the UK the Cival Aviation Authority website has all the information you need about the laws and regulations surrounding drone flight.
Capturing the images -
The capturing process is fairly straight forward, with the main goal being to capture as much visual and spatial information as possible - the larger the dataset that we input into Reality Capture the more accurate our final model will be. I typically collect around 5-6 sets of images at various heights from both a top down perspective and an elevation perspective.
In the image below you can see the camera postions illustrated. There are three top down passes at 40m, 30m and 20m altitudes and two elevation passes (which are harder to see) at 20m and 40m altitudes.

It is recommended to have at least a 75% overlap between each photo so Reality Capture can successfully match point data from image to image; doing this manually while flying can be tricky, thankfully, Litchi has a waypoint plotter feature which allows you to pick points on a map and create an automated flight path for your drone to follow. You can set the camera angle and define whether or not to capture a photo at each waypoint.
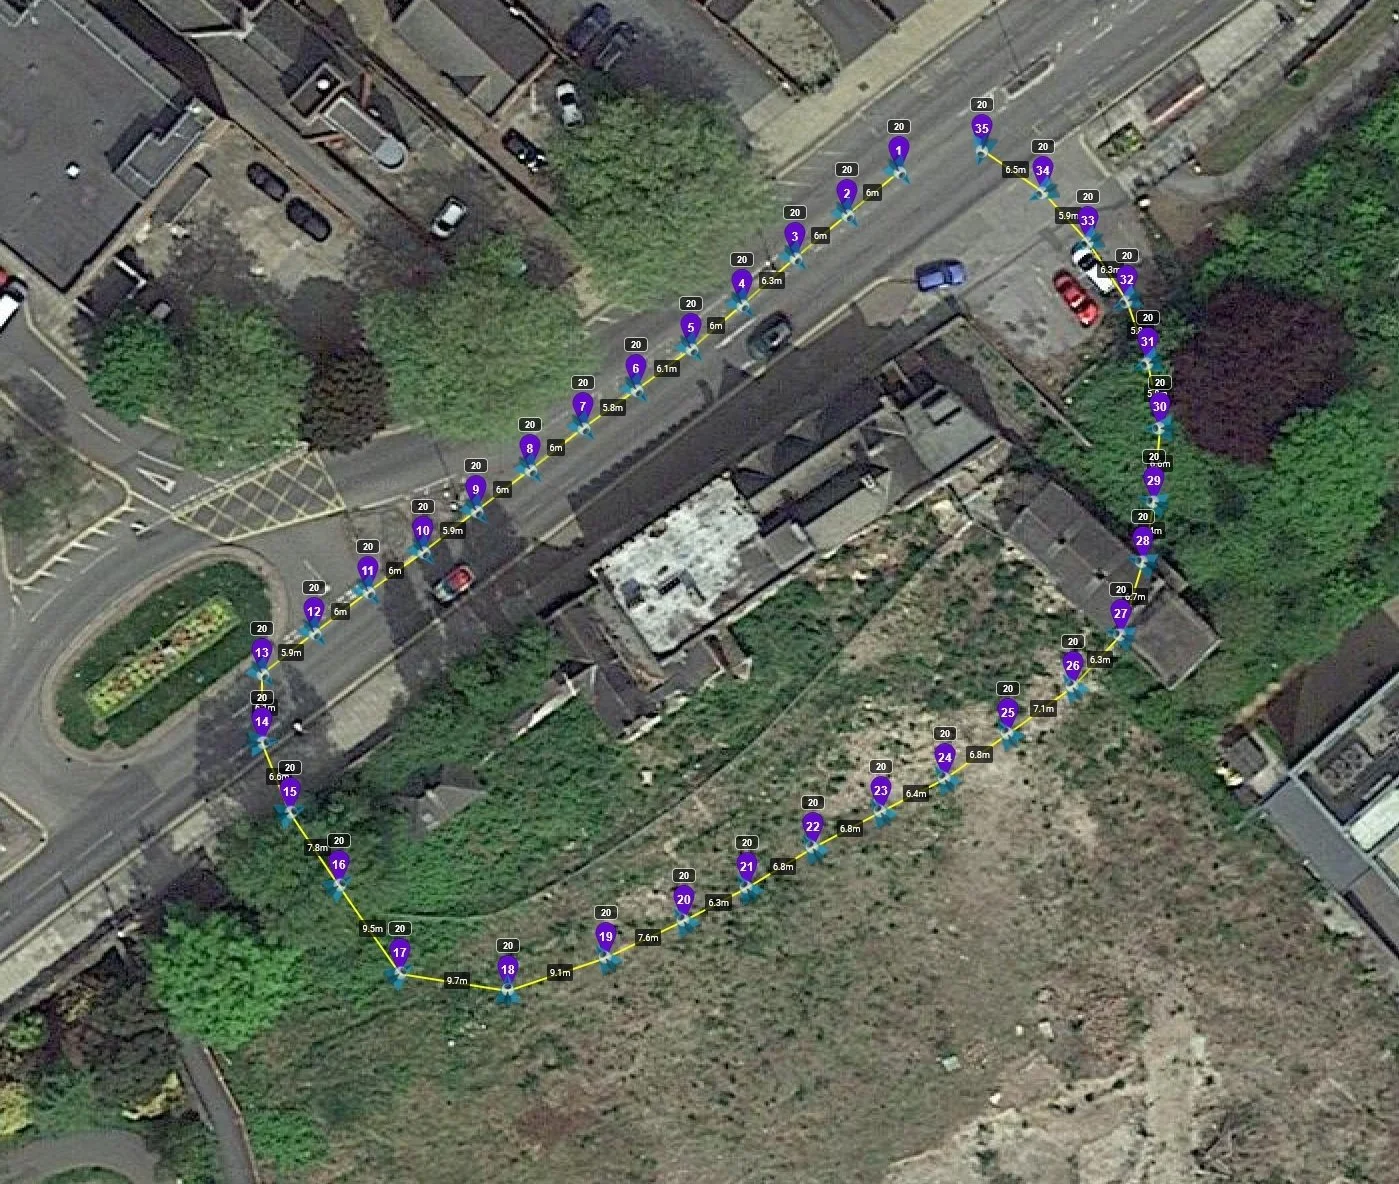
In the image below you can see that I have set my waypoints at 5m intervals running back and forth in a grid like pattern which encompasses the entirity of my subject building. The camera was set at -90° and a total of 99 photos were taken. This path was duplicated two more times with the altitudes changed to 30m and 20m respectively.

Litchi - Waypoint Plotter. Top Down (Plan) photo set 01 at 40m Altitude.
I then did a similar thing for the elevation passes. I plotted out a route which encircled the subject building at 40m altitude and set my waypoints at a uniform distance apart. I made sure to orientate the drone so it was always focusing on the subject building and specified the gimbal angle of the camera to keep the building in frame. This was then repeated at 20m altitude with the camera gimbal angle being altered in order to reflect the change in altitude.
Litchi - Waypoint Plotter. Elevation photo set 01 at 40m altitude.
Model Reconstruction
In the next paragraphs I will outline the steps you need to take in order to create a full model reconstruction within Reality Capture. This is intended to be a condensed step by step guide and I will not be going into great amounts of detail. However if you require great amounts of detail there is a pretty comprehensive Help section contained within the software itself. If you ever run into trouble this is the best place to check for information. Reality Capture also have a decent Youtube channel with tips and tutorials.
Importing the images into Reality Capture -
Once all our images have been captured it’s time to import them into Reality Capture and see if our hard work has paid off!
Open Reality Capture
In windows explorer navigate to where you have saved your captured images and drag and drop the folder onto the Reality Capture window.
The images should load automatically.
Set your viewport layout to 1+1+1 by selecting “Layout” in the Workflow ribbon and navigating to 1+1+1.
You should now have a screen that resembles the image below. Each viewport pane can be changed to show different information by clicking on the small grey rectangle in the top right corner and switching between the drop down options.
Aligning the imported images -
Now we have all our images loaded into Reality Capture we need to align them. During the alignment process Reality Capture calculates the camera positions, orientations and internal camera states for each image. The common points between images are identified and a sparse point cloud is generated.
In the Workflow ribbon select “Align Images”
Depending on the number of images you have loaded into the scene this process can take a few seconds to several minutes to complete.
Save the project by hitting ctrl+S on your keyboard.
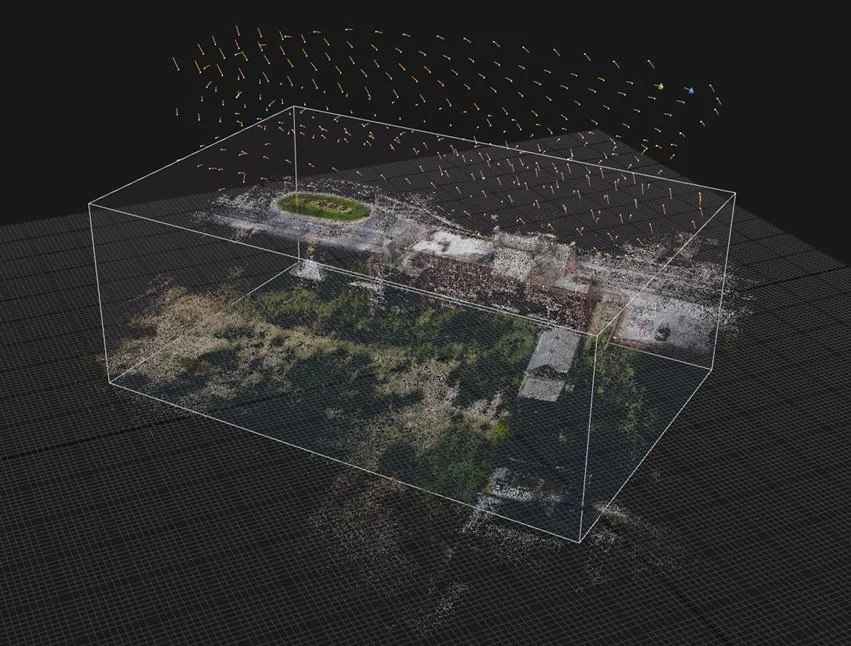
By setting the central viewport to 3Ds we should now see that Reality Capture has generated a sparse point cloud from the completed image alignment. The corresponding camera positions are also displayed.
You can move around and rotate in the viewport by holding the right mouse button and dragging. At this point you can really get a feel for the three dimensional form of the created point cloud.
Setting the reconstruction region -
You will often find that Reality Capture has calculated points that are outside our area of interest. To save time on reconstruction computation and to create a neater looking model we can define a specific area we would like Reality Capture to focus on reconstructing.
The grey box encompassing our point cloud is the reconstruction region; we can adjust the size of this box to effectively crop out areas that we dont need.
Use the reconstruction region gizmo to crop your subject
The coloured arrows allow you to move the reconstruction region along the X,Y & Z axis
The coloured dots allow you to scale the reconstruction region
The coloured arcs allow you to rotate the reconstruction region
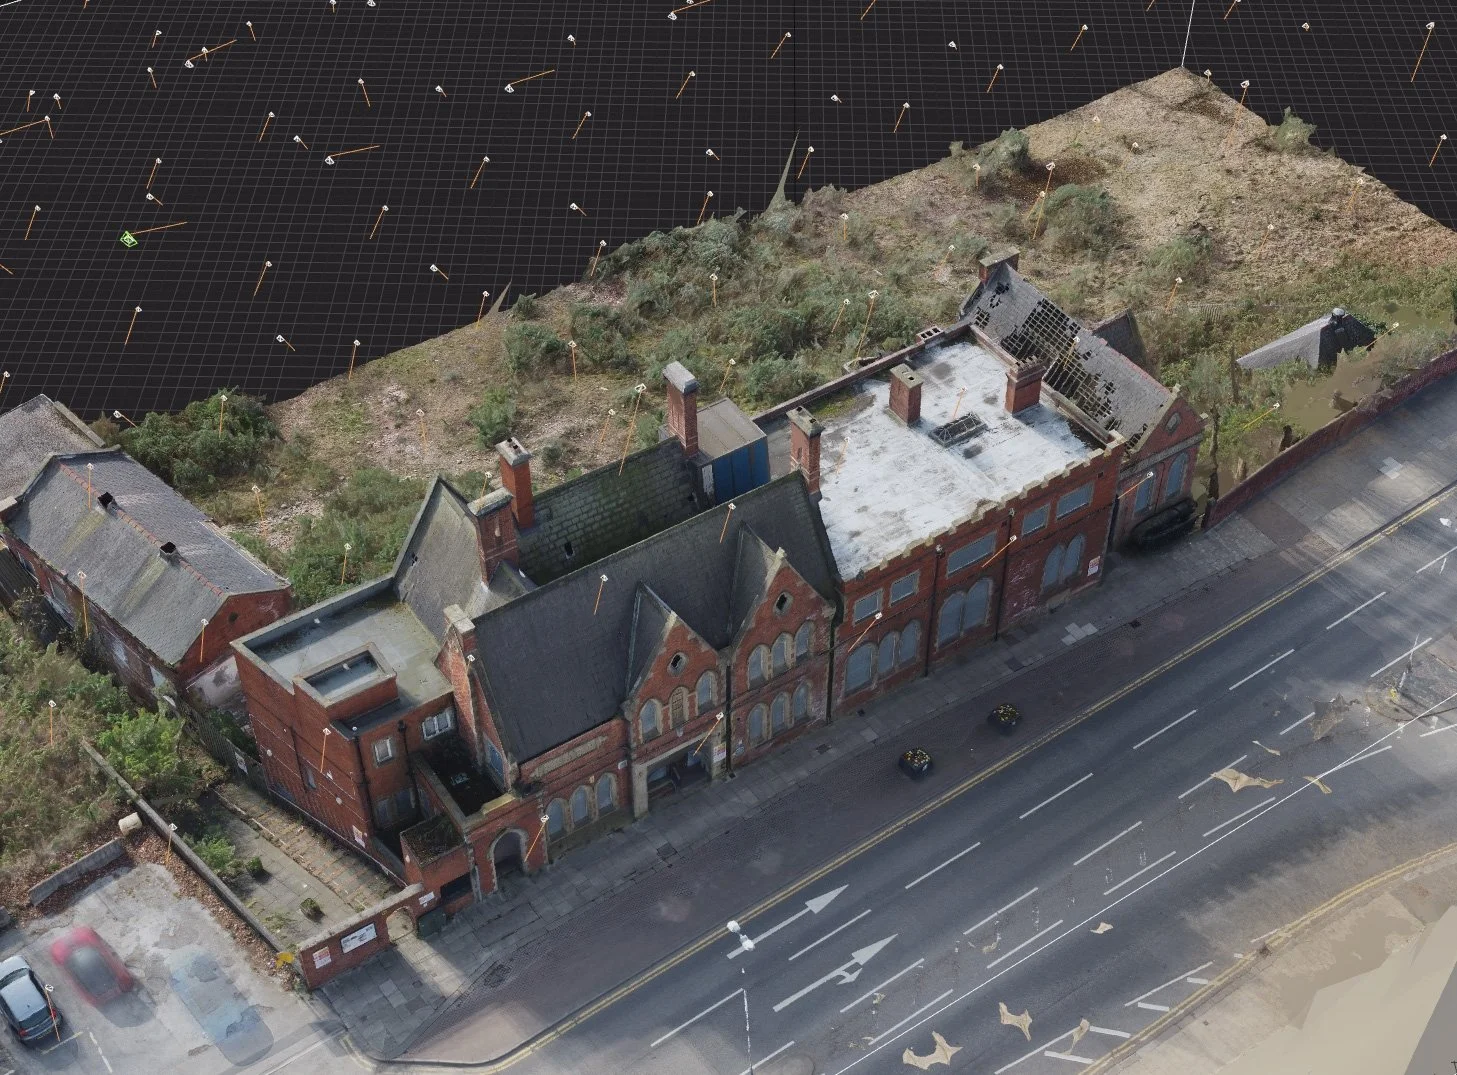
In the image below you can see my cropped reconstruction region. Everything outside the box will be ignored during reconstruction.
Computing the model -
Once our point cloud has been calculated and we have set our reconstruction region we are now ready to compute the model.
Various levels of quality can be selected - Preview, Normal and High. Higher levels of quality will obviously take a longer time to compute. This is one of the most time consuming stages of the process and, In most cases, Normal quality is just fine.
Navigate to the Workflow ribbon
Select the Calculate Model drop down arrow
Choose Normal quality from the drop down and the computation will start
When the computation has finished a dense triangulated mesh will be shown in the viewport.

Simplifying the mesh -
The mesh produced by Reality Capture will contain A LOT of triangulated faces. In order to make the model a more manageable size for use within other 3D applications like 3DSMax, Blender or for upload to platforms like Sketchfab we need to dramatically reduce the triangle count.
This is sometimes known as mesh decimation and in Reality Capture the process is very straight forward.
For this particular model my original triangle count was sitting at 21.9 million tris, by using the Simplify Tool I was able to decimate the triangle count to 2 million and still have a decent looking mesh.
Set your left hand viewport pane to 1Ds
In the Workflow ribbon select the Simplify Tool (you should notice a new tab pop up in the left viewport)
In the Simplify Tool tab find the Target Triangle Count option and input your desired amount.
This can be a trial and error process, I usually decimate the mesh a few times each time with lower and lower triangle counts until I reach a balance of quality and optimization.
Save your project
Texturing the mesh -
For me this is the most exciting part of the process. Once the textures are added to the mesh the model comes alive and you can sit back and admire your handiwork!
There are two options when adding colour or texture to your mesh, they are convieniently named Colorize and Texture in the Workflow ribbon.
Colourize calculates a colour for each scene vertex and is less computationally intensive. It is best to use the Colourize option on very dense meshes as adding actual texture data will not improve the visual quality of the model.
Texture calculates a small image for each individual triangle of the mesh. It is more computationally intensive than Colourize and is best used on decimated meshes where the triangle count is less dense. It usually works well straight out of the box but if you run into trouble consult the Help menu!
Exporting the textured model -
To export the model navigate to Export in the Workflow ribbon and choose your prefered export option, it’s that simple.
You will now have to create a folder where your export will be saved. Once this step is done you will be greeted with a sign in window in order for you to obtain the license to access your model. The amount of credits needed to buy the license will be show along with a cost in currency - this is dependent on the amount of images you have used and the resolution of those images.
Here is a handy cost calculator so you can price your scans beforehand.
If you would like to upload the model directly to your Sketchfab account you can do this by clicking on Share in the Workflow ribbon.
To view the model created in this article please click on the image below.